Track routing will add depth, fullness, and character to a mix but can quickly make a project very complicated. If done correctly, it will also give the instruments some cohesion and help them sound like they are playing in the same space. In this article, I will share some advanced routing tips and show you how I set up my bus tracks for everything I release.
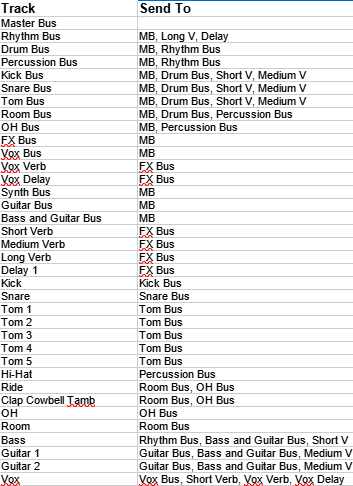
In audio engineering, track routing is defined as sending an audio signal from one place to another within a digital audio workstation (DAW). There are three options for how the sound is sent: pre-fader/post FX, pre-fader/pre-FX, or post fader/post pan. Pre-fader/post FX means the sound will be sent unaffected by the volume and pan faders on the instrument channel, but with all FX applied. The pre-fader/pre-FX setting means the audio will bypass the FX, as well as the volume and pan faders. In most cases I will route my instruments post fader/post pan, meaning the sound will be sent after the volume, pan, and FX of the instrument track have been applied. It’s important to realize that routing sends a copy of the sound to the track bus; the original instrument track remains the same. Think of bus tracks as a way to help support the original instrument tracks and give them character while adding subtle effects like EQ, compression, reverb, and delay. The list below shows my usual track setup, the 20 bus tracks I use strictly for routing (in red), and where I send the audio from each track.

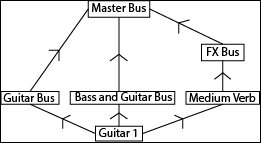
The first thing you might notice is that everything eventually funnels into the Master Bus (MB). Regardless of where a track is routed, or how many buses it goes through, the signal should always finish at the Master Bus. All of my instrument tracks are routed to Short Verb, Medium Verb, Long Verb, or Delay depending on what type of sound it is and where I want it to sit in the mix. The bass guitar is a more prominent instrument that I want up front in the mix so I send it to the Short Verb bus. If it’s an atmospheric synth that I want more in the background, I send it to the Long Verb or Delay bus. As an example, let’s take a look at the audio signal path of Guitar 1.

I like to route my guitars to three different areas since they are usually an integral part of a song’s overall sound and I want them to be nice and full. The Guitar Bus helps blend all of the guitars together, the Bass and Guitar Bus combines the bass and guitars, and the Medium Verb bus adds some reverb and gives the guitars some depth. The first two buses are then routed to the Master Bus, but the Medium Verb bus is sent to the FX Bus to be blended with the other verb and delay effects. The FX Bus is a unique track because it provides a simple way to adjust the level of the overall reverb and delay in your mix with a single knob. Finally, the FX Bus is sent to the Master Bus. Each step in the routing process adds something to the original instrument sound and/or blends it with other instruments as it makes its way to the Master Bus. The specific volume levels and effects that are applied to the bus tracks will vary; some musicians and engineers like their mix washed heavily in reverb and delay, while others prefer more of a raw feel.
The two most common effects I use on my bus tracks are equalizer (EQ) and compression, but I try to keep it subtle and only make slight adjustments. Start by setting up EQ and compression on all of the bus tracks, then solo one instrument as well as every bus its audio signal passes through. Using a guitar track as an example, solo the Guitar, Guitar Bus, Bass and Guitar Bus, Medium Verb, FX Bus, and Master Bus tracks. Take a minute to think about the sound of the instrument and how it could be improved. For example, if my guitars need more low end to fatten them up I can do that by boosting a frequency with the EQ on the Guitar Bus. If the vocal S’s are sounding a bit harsh I’ll remove a bit of that frequency with the EQ on the Vox Bus. Each bus track the sound passes through will add a copy of the original sound to the mix, while applying the effects of the bus track. It’s important to remember that what you apply to a bus track will affect all sound that passes through it. If a specific instrument needs a frequency correction, fix it on the original instrument track rather than on a bus. After making adjustments to the EQ and compression, adjust the volumes of the bus tracks (except the Master Bus) while keeping the original Guitar track louder than the bus tracks. Blend the sound from the buses with the original sound to help give the track some depth and character while maintaining the core sound of the instrument. Systematically go through each instrument this way, then turn all of the tracks on and give the whole mix a careful listen. Inevitably the buses will need to be adjusted again, and tweaking the buses will be an ongoing process until your final mix is complete.
Track routing can take your song to the next level and is an essential part of creating a professional mix. While the volume and pan of the Master Track should remain level, the other bus tracks are an opportunity to blend instruments, accentuate good frequencies, remove bad frequencies, add character, fill in your mix, and obtain the overall sound qualities you want in your final product. When done properly, it can give the song cohesion and really tie the mix together.
